Monday, August 31, 2015

Family Good Times Scrapbook Album Kit

Happy Monday everyone! It's been a busy few weeks for me with end-of-summer travel, design team projects, and getting my house ready to sell. But, I found some time this past week to play with the new Echo Park, The Story of Our Family Collection. I love the colors so much, I made a new album kit for the shop! 

This scrapbook is titled Family Good Times and I designed its with a 6x8 inch black Simple Stories binder.

This new mini album is available as a DIY kit or pre-made and will be a wonderful keepsake for your family's memories. It would also make a great gift idea!

The album has 20 scrapbook pages (6 full double-sided scrapbook pages and 4 double-sided divided photo sleeves). The album will hold at least 46 photos and includes 10 plastic page protectors.

I always create my albums so that photos can easily tuck under embellishments, and I always use only acid-free, photo-safe supplies. Some of the sayings throughout the album are "Together is the Best Place to Be", "You Are So Amazing", "Home Sweet Home" and "Owl Always Love You".


Supplies: As an Amazon Associate, I earn from qualifying purchases.  Affiliate links are used in this post at no additional cost to you. I receive a small amount of compensation when you click through and shop using the provided links. This helps me to continue building my small business. Thank you!

Tuesday, August 18, 2015

Embossed Cards with We R Memory Keepers

Hey guys, today it's my turn over on the We R Memory Keeper's blog!  For my project, I made a few cute and fun embossed cards. I love making handmade cards but sometimes I don’t have the time to stamp or print a sentiment. So ... using these new embossing strips are a super quick and easy way to make a great impact on the front of a card. Check it out ...

I used We R’s card stock and since it has a white core, the embossing looks great with a bit of sanding.  Tip:  I ran the paper and embossing strip through my Evolution first, and then cut the paper to the size I wanted for the card.  This way, if the paper shifted, I could adjust how I cut the piece out.

I hope this has given you some ideas for fun and easy cards. We R Memory Keepers has lots of great embossing strips and they come in sets of 6 different phrases.

Thanks for stopping by today!


Blog * Facebook * Instagram * Pinterest

Tuesday, August 11, 2015

Blog Hop with Lori Whitlock Designs

Hi everyone!  
Welcome to Lori Whitlock's Creative Team August blog hop! 


If you just hopped on at Artsy Albums, be sure to head back over to Lori's site to start the hop from the beginning!  The Creative team has lots of fun projects to share with you and as always, Lori is having a sale and a chance to win a gift card!

For my project, I created one of Lori's adorable "belly boxes".  She has the cutest styles for these ... a bunny, panda, pig, lamb, dog, cat,  and lots of others.  I chose to do the elephant ... so cute!!  You can check out all of her belly box animals here.


Be sure not to miss Lori's sale!  Use coupon code AUGUST to receive 30% off the designs in her SVG shop, and if you like the digital designs, you can also save 30% at Snap Click Supply too!


Thanks for stopping by!  Please visit Artsy Albums on Facebook to stay up-to-date on the newest kits we have at Artsy Albums, in addition to sales, giveaways, and coupons !

Now back to the hop!  Your next stop is:  Kathy Skou


Monday, August 10, 2015

Baby Boy Cards with Doodlebug

Hey guys! Doodlebug Designs is featuring a color challenge over on their blog. The design team was asked to pick a Doodlebug color to play with this week and I chose Blue Jean! It was easy for me to focus on this color because as a mom of two boys, blue has always been the color-of-choice around my house.


I decided to make three very different cards for my project so that I could play with lots Doodlebug products.

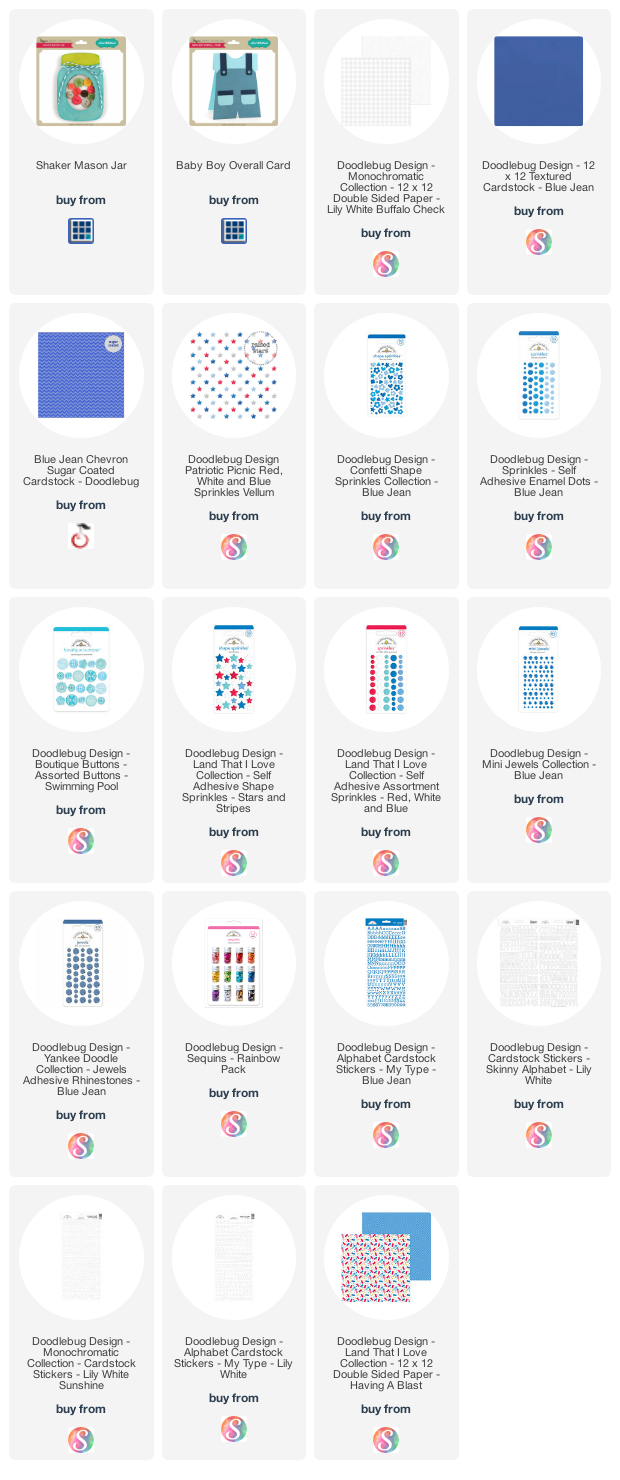
For the first card, I created a mason jar shaker card using a cut file called Shaker Mason Jar by Lori Whitlock (link below). I loaded it up with blue jean colored boutique buttons and sequins, along with one red button for a pop of color. You can buy those Doodlebug buttons and sequins at a great shop, here and here.


For the second card, I used one of Doodlebug's Create-A-Cards and punched a star in the top. Then in true "Melinda Spinks" fashion I added lots of sprinkles and gems to give the star some shine. I used Doodlebug's Doodles cardstock stickers to add a quick sentiment but you can also use .


Finally, for my last card I used another cutting file from Lori Whitlock called Baby Boy Overall Card (link below) to make a sweet pair of overalls. This one came together easily with patterned paper from the Snips and Snails collection and sprinkled star vellum from Patriotic Picnic. Then I had a few critters from the Forest Friends Doodle-pops peeking out of a pocket. Love them!

Since some products are from older Doodlebug collections, I found a few similar ones and added links below along with some of the actual products.  

Supplies: Affiliate links are used in this post at no additional cost to you. I receive a small amount of compensation when you click through and shop using the provided links. This helps me to continue building my small business. Thank you!
As always, thanks so much for stopping by. To get great scrapbooking ideas & to stay up-to-date on new products & sales please "like" Artsy Albums on Facebook, Instagram & Pinterest!

Saturday, August 8, 2015

Vintage Scrapbook Photo Crate with Kaisercraft

Hey friends! I'm hopping on the blog to share a new kit addition to the Artsy Albums shop, and oh my goodness ... this one was fun! This unique scrapbook photo crate is not only a beautiful way to save photos but it's also a perfect place to store greeting cards, tickets and other memorabilia.

Vintage Scrapbook Photo Crate with tags, cards, and folders
To purchase the instructions for this photo crate visit:

As soon as I saw these crates by 7 Gypsies, I knew I wanted to use them for a unique photo memory project kit. I decided to make it with a vintage family / heritage theme so, I chose the Kaisercraft, Antique Bazaar Collection. It was perfect.

Vintage Scrapbook Photo Crate with tags, cards, and folders

The 7x5x4 inch wooden crate is filled with folders, chipboard pages, tags, and cards, all beautifully decorated with gorgeous paper and die-cuts.

Vintage Scrapbook Photo Crate with folders

I love the idea of tucking photos and memorabilia into these small file folders.

Vintage Scrapbook Photo Crate with tags and cards

I added some great metal embellishments by Tim Holtz for Idea-ology. The small gear, brads, paper clips, and book rings really add to the antique feel. 

I hope you have fun with this one! Hop over to my shop to see this amazing project and the newest kits, premades, instructions, and supplies! Thanks so much for stopping by! 😊

Update: This kit has sold out but the instructions are available in my shop. They are simple, step-by-step, and include full color photos of each page. Links for the instructions and the products used are below. Happy scrappin'!

Supplies: As an Amazon Associate, I earn from qualifying purchases.  Affiliate links are used in this post at no additional cost to you. I receive a small amount of compensation when you click through and shop using the provided links. This helps me to continue building my small business. Thank you!

Tuesday, August 4, 2015

Lightbulb Garland with We R Memory Keepers

Hello friends! Everyone is having fun with garland and banners these days. Pinterest is full of crafty ideas for these great projects and ... they are not just for parties anymore. Many people use them for interesting decor!

So, I created this an interesting lightbulb garland for the We R Memory Keepers blog today! 


This garland would add a bit of whimsy to any space. It would be great for a child's or teen's room, a dorm or an office! Or, use this for a fun celebration like a birthday party, special anniversary, or New Year's Eve! The metallic gold & glitter would be perfect for that.
 

To create the banner, I used the Evolution Advanced Cutting Machine, the Lightbulb Garland Die Set and the new Clearly Posh collection.
 

I cut the lightbulb shapes out of white card stock and the Clearly posh acetate.  The dies will create an impression in the acetate, which is then easy to cut around with a pair of scissors.
 
 
The garland comes together super quick once all of the pieces are cut.  I added some self-adhesive sequins to the top of each lightbulb and finished the end of the banner with a few gold plastic bows.
 

Thanks for stopping by today and happy crafting!

Supplies:
Evolution Advanced Cutting Machine
Lightbulb Garland Die Set
Clearly Posh Acetate paper and bows
Gold Glitter Designer Poster Board
Sequin Stickers


Blog * Facebook * Instagram * Pinterest